

Preparing for my hygiene inspection was quite stressful. Having never experienced anything like it before, I worried about how I would be judged and whether my small kitchen and extraction methods would meet the county’s standards. But they did. I had my inspection on 4th August 2023, and I received a very good rating. I want to show you the space I use to extract the honey I jar up and sell.
I'll also walk you through my extraction setup and the equipment I use. Some of you may be surprised at how small my setup is. I'll share the paperwork I keep and what I had prepared for the hygiene inspector on the day. The honey extraction space My kitchen doubles as my honey extraction space. As you can see in the photo, there’s minimal countertop space above the washing machine, and only one sink. There’s also a bathroom door, a cupboard door, and an open hallway connected to the kitchen. My extraction line is set up in the centre of the kitchen when I’m working. These items are not permanently in place. When I’m not extracting honey and using the kitchen for daily activities, I store the extraction line items in designated spots around the kitchen or on top of other stainless steel furniture. They’re wrapped to avoid dust accumulation. Since my extraction line is manual, there are no power leads to navigate around.


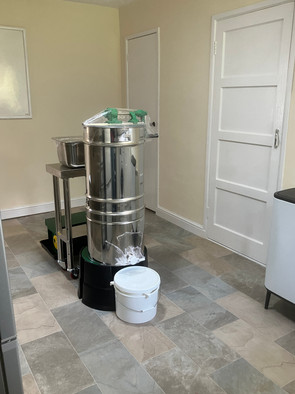
The extraction equipment
Aside from the food-safe plastic honey buckets, all the equipment that comes into contact with consumable honey is stainless steel. This was my largest equipment investment, but it gives me peace of mind. Here are some of the key pieces of kit in my extraction line:
Oil drip trays with castor wheels (used to wheel in hive boxes of honey)
Stainless steel trolley with brakes
Gastronorm tray with sieve (my uncapping tray)
Uncapping fork (a basic, inexpensive one with a plastic handle works fine)
Water butt stand with a waterproof painted wooden top (a Jem’s Bees® innovation! It’s at a good working height for me, and wipeable!)
Stainless steel 4-frame SAF tangential extractor with built-in sieve
Plastic honey buckets
Stainless steel honey settling tank (not shown in the first set of photos)
How I extract the honey I extract honey by myself over several days. I don’t rush it, and I make sure my diary is clear. Here’s how I use the extraction line to get the runny honey from the hives:
1. I bring sealed supers and/or nuc boxes of capped honey to my front door using my neighbour’s heavy-duty, festival-style trolley.
2. I place the supers and/or nuc boxes on trays with wheels, which are waiting by the door. I then remove my beekeeping clothes and leave them at the front door. I wheel the loaded trays to the side of the stainless steel trolley. The trays can hold a stack of boxes (there’s only one green nuc box on the tray in the photo).
3. Wearing freshly donned PPE from the honey cabinet, I uncap the frames over a large Gastronorm tray with an inbuilt sieve. The honey drips into the tray, leaving wax cappings in the sieve above. Nothing goes to waste, as I use both the wax and the honey.
4. I place the uncapped frames into the tangential extractor. I repeat the process until the extractor holds four frames.
5. I spin out the honey using the hand-cranked centrifugal force of the extractor. The empty frames are then returned to the box, ready to be moved outside later.
6. Once the extractor is full, I open the honey gate and let the honey flow into a bucket with a double strainer on top to catch any remaining bits of wax.
The honey cabinet and the honey warming cabinet In the first photo, you’ll spot a large stainless steel cabinet against the kitchen wall and a smaller stainless steel box next to it. I use the larger cabinet to store jarred honey, honey buckets, PPE, and other small extraction-related items. The smaller unit is a temperature-controlled catering plate warmer, which I use as a honey warming cabinet. It has a removable shelf so I can warm multiple layers of jars or remove the shelf entirely to place 30lb buckets of honey inside. It’s a perfect fit for my space, and when not in use, my tangential extractor sits on top of this cabinet, wrapped up.


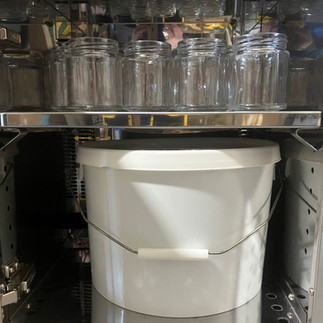
The large stainless steel cabinet has several shelves. I bought it from a catering company, and it’s been a godsend. The bottom shelf holds all my PPE (hair nets, gloves, and aprons), as well as a first-aid kit and cleaning cloths designated for my extraction equipment. The next shelf up holds my calibrated scales, catering cling film to wrap the extraction equipment after cleaning, my honey refractometer, and all my honey-related paperwork. The remaining shelves store empty buckets and jars. Though the shelves can take the weight of a full bucket or two, I avoid overloading them, and I regularly attend events to avoid having too many full buckets of honey around. The paperwork

I laid out all my paperwork for the inspector, and I’m glad I did. Here's what was included: my Level 2 Food Safety & Hygiene for Catering certificate, the calibration certificate for my weighing scales, and my Jem’s Bees® HACCP plan for honey production. I also had my Veterinary Medicine Administration Record for my bees and my honey batch extraction record sheets. Additionally, I brought out equipment receipts, though the assessor didn’t need to go through them. To the right of the photo, you can see my Food Safety for Beekeepers book and the Safer Food, Better Business for Caterers guide. I had questions about the latter and went through it with the assessor. I wasn’t asked for any other documentation, and what I provided served me well. The Food Safety for Beekeepers book helped me prepare for the inspection. However, on the day, the assessor preferred the Safer Food, Better Business for Caterers guide. Each inspector may differ, and not all will have experience dealing with beekeepers, so requirements may vary from county to county. As a beekeeper, if you're ever unsure, ask the assessor what they expect. They’re there to ensure you follow safe, responsible practices, and they’re usually happy to offer advice. The assessor left me with a copy of the assessment form, and I received my food safety sticker in the post shortly after. My HACCP plan was detailed, so it was taken away for further review. The assessor later followed up, confirming everything was fine and requesting a minor clarification in one section. Final thoughts
Preparing for a food hygiene inspection may seem daunting, especially if you don’t have a designated honey room, but it’s absolutely achievable with the right preparation. By staying organised, keeping thorough records, and ensuring your space is as clean and functional as possible, you can feel confident when the time comes. If you have any specific questions or would like advice on preparing for your own inspection, feel free to get in touch—I’m happy to help!
Comments